4. Phone app & web preview
Two minutes on the phone: connect over Wi-Fi, check the live view, set bitrate, record, and upload to your own S3 bucket. The written steps on this page are the same flow.
The device supports four viewing and control options: browser preview, Android, iOS, and HarmonyOS. Start and stop recording with the physical switch, app, or web page; the app reflects switch changes.
Web preview
Firmware requirement: web preview needs device firmware EGO1 ≥ 1.0.7 / EGO1GS ≥ 1.0.2. On older firmware, upgrade with the Android app first (see Firmware upgrade (OTA)).
Phones that cannot install the app (older or compatibility-limited Android), or anyone who just wants a quick look, can preview, start or stop recording, and manage the device in a browser. The browser must support H.265 decoding (for example Safari); otherwise the page asks you to use the app.
Connect to the device hotspot
- Insert a card and power the device (see Power, record, and power off). The device broadcasts a Wi-Fi hotspot named GILABS-XXXXXXXX (the 8-character code is on the sticker on the back). The hotspot is on the 5 GHz band and falls back to 2.4 GHz automatically if no 5 GHz channel is usable; use a phone that supports 5 GHz for a smoother preview. Since firmware 1.1.5 the hotspot stays on even after the device has joined your Wi-Fi. If a device was previously configured for a Wi-Fi network and you want it back on its own hotspot, use Forget and return to hotspot / Reset to setup hotspot in the web page or the app rather than power-cycling.
- Open the phone or tablet's Settings → WLAN / Wi-Fi, find GILABS-XXXXXXXX in the list, and connect.
- The hotspot is an open network (no password). The system may warn "this network has no internet / no Internet access / stay connected?". That is normal (the device itself is not online). Choose stay connected / keep using this network / use this network anyway so the phone does not switch back to another Wi-Fi.
- Once connected, the device's gateway address is fixed at 192.168.4.1.
Open it in a browser
- Hotspot mode: on the phone, tablet, or computer connected to the GILABS-XXXXXXXX hotspot, open http://192.168.4.1.
- Same-Wi-Fi mode: if the device has joined a Wi-Fi network and your device is on the same network, open http://GILABS-XXXXXXXX.local (the 8-character code from the sticker on the back). No need to join the hotspot.
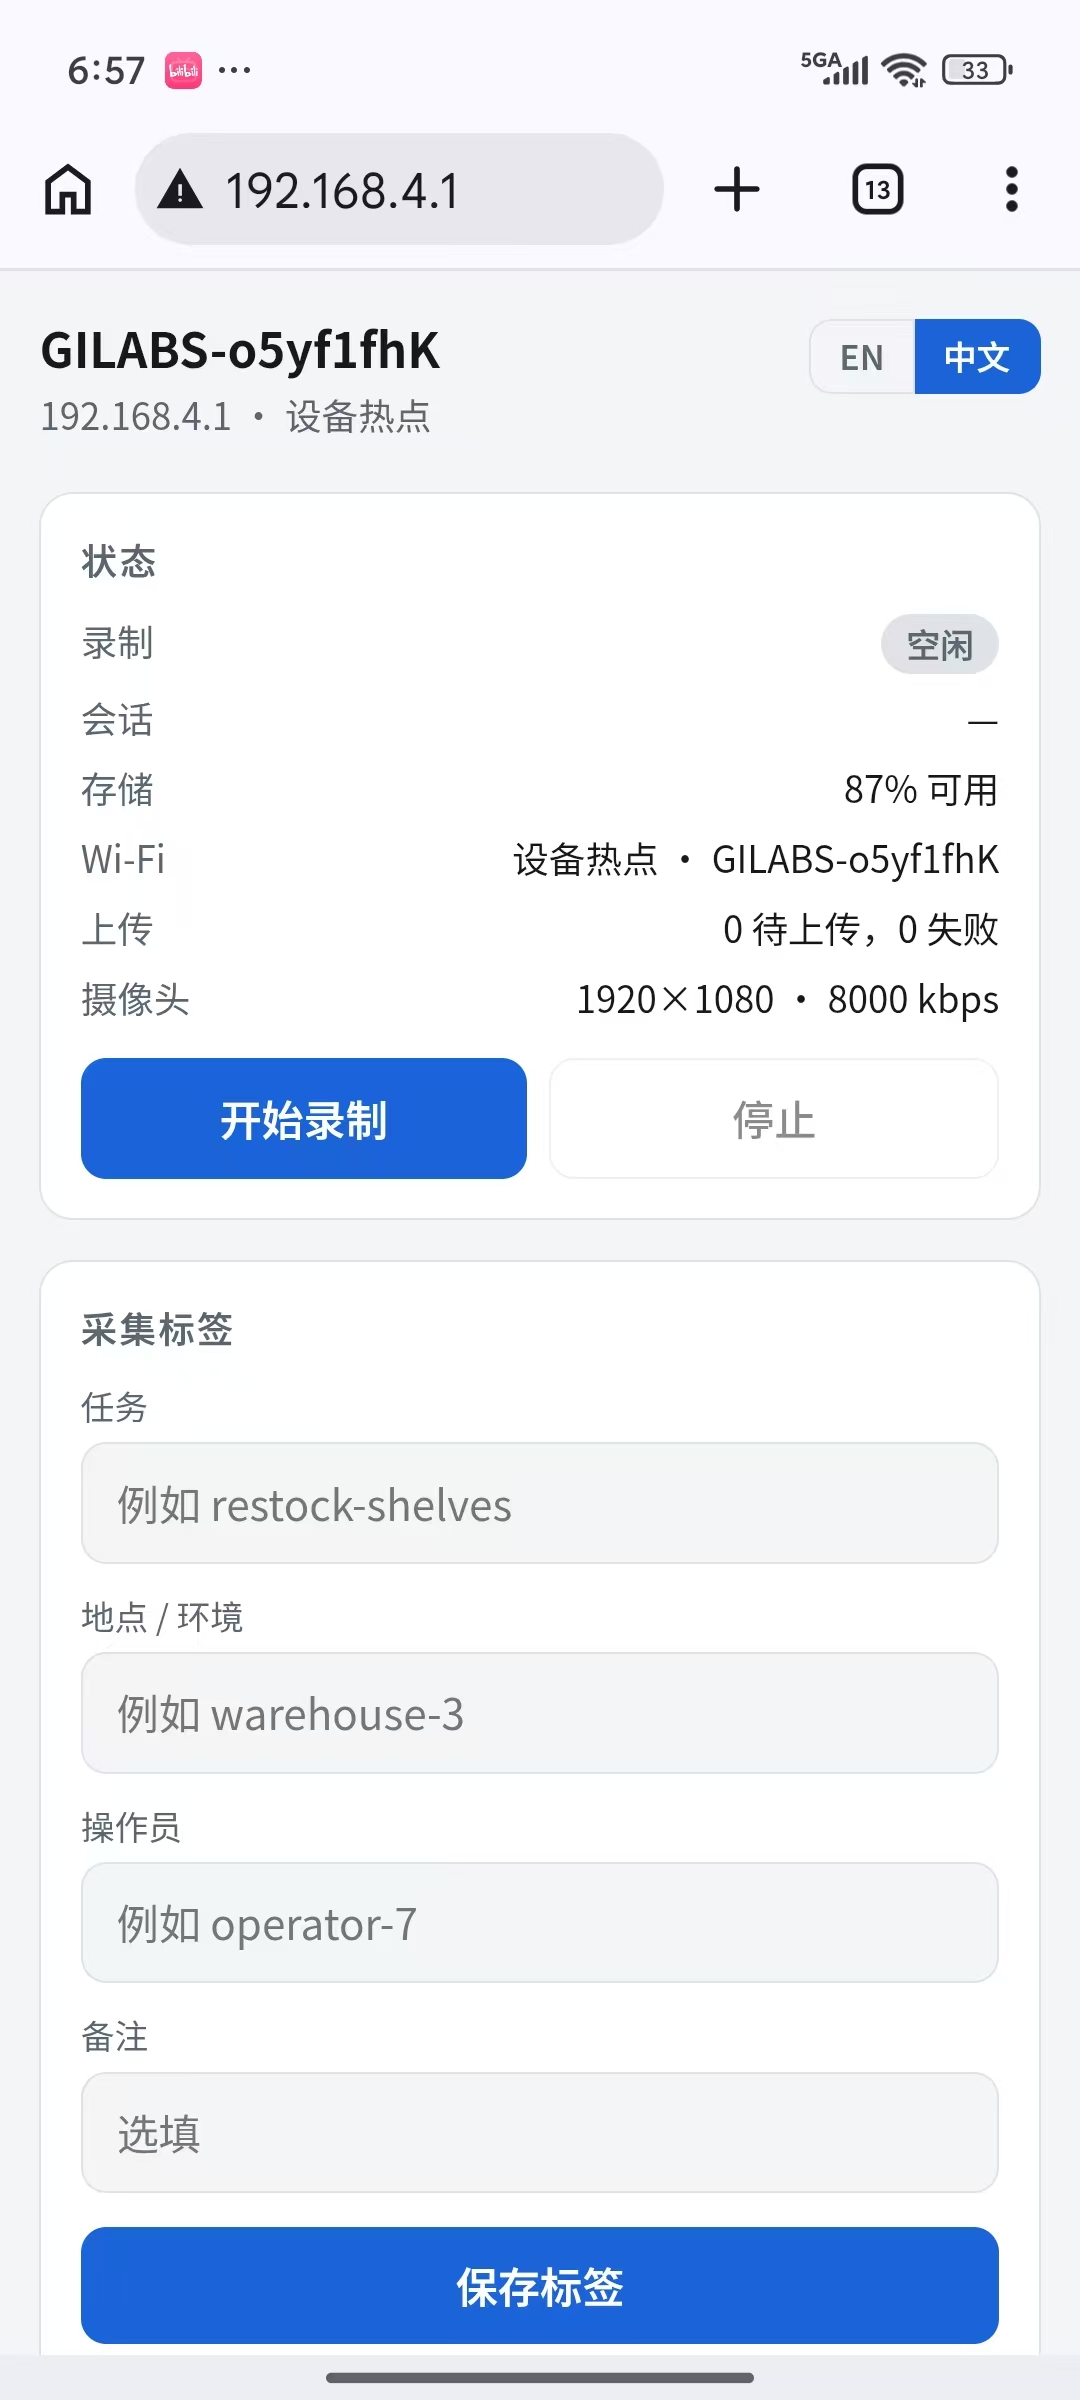
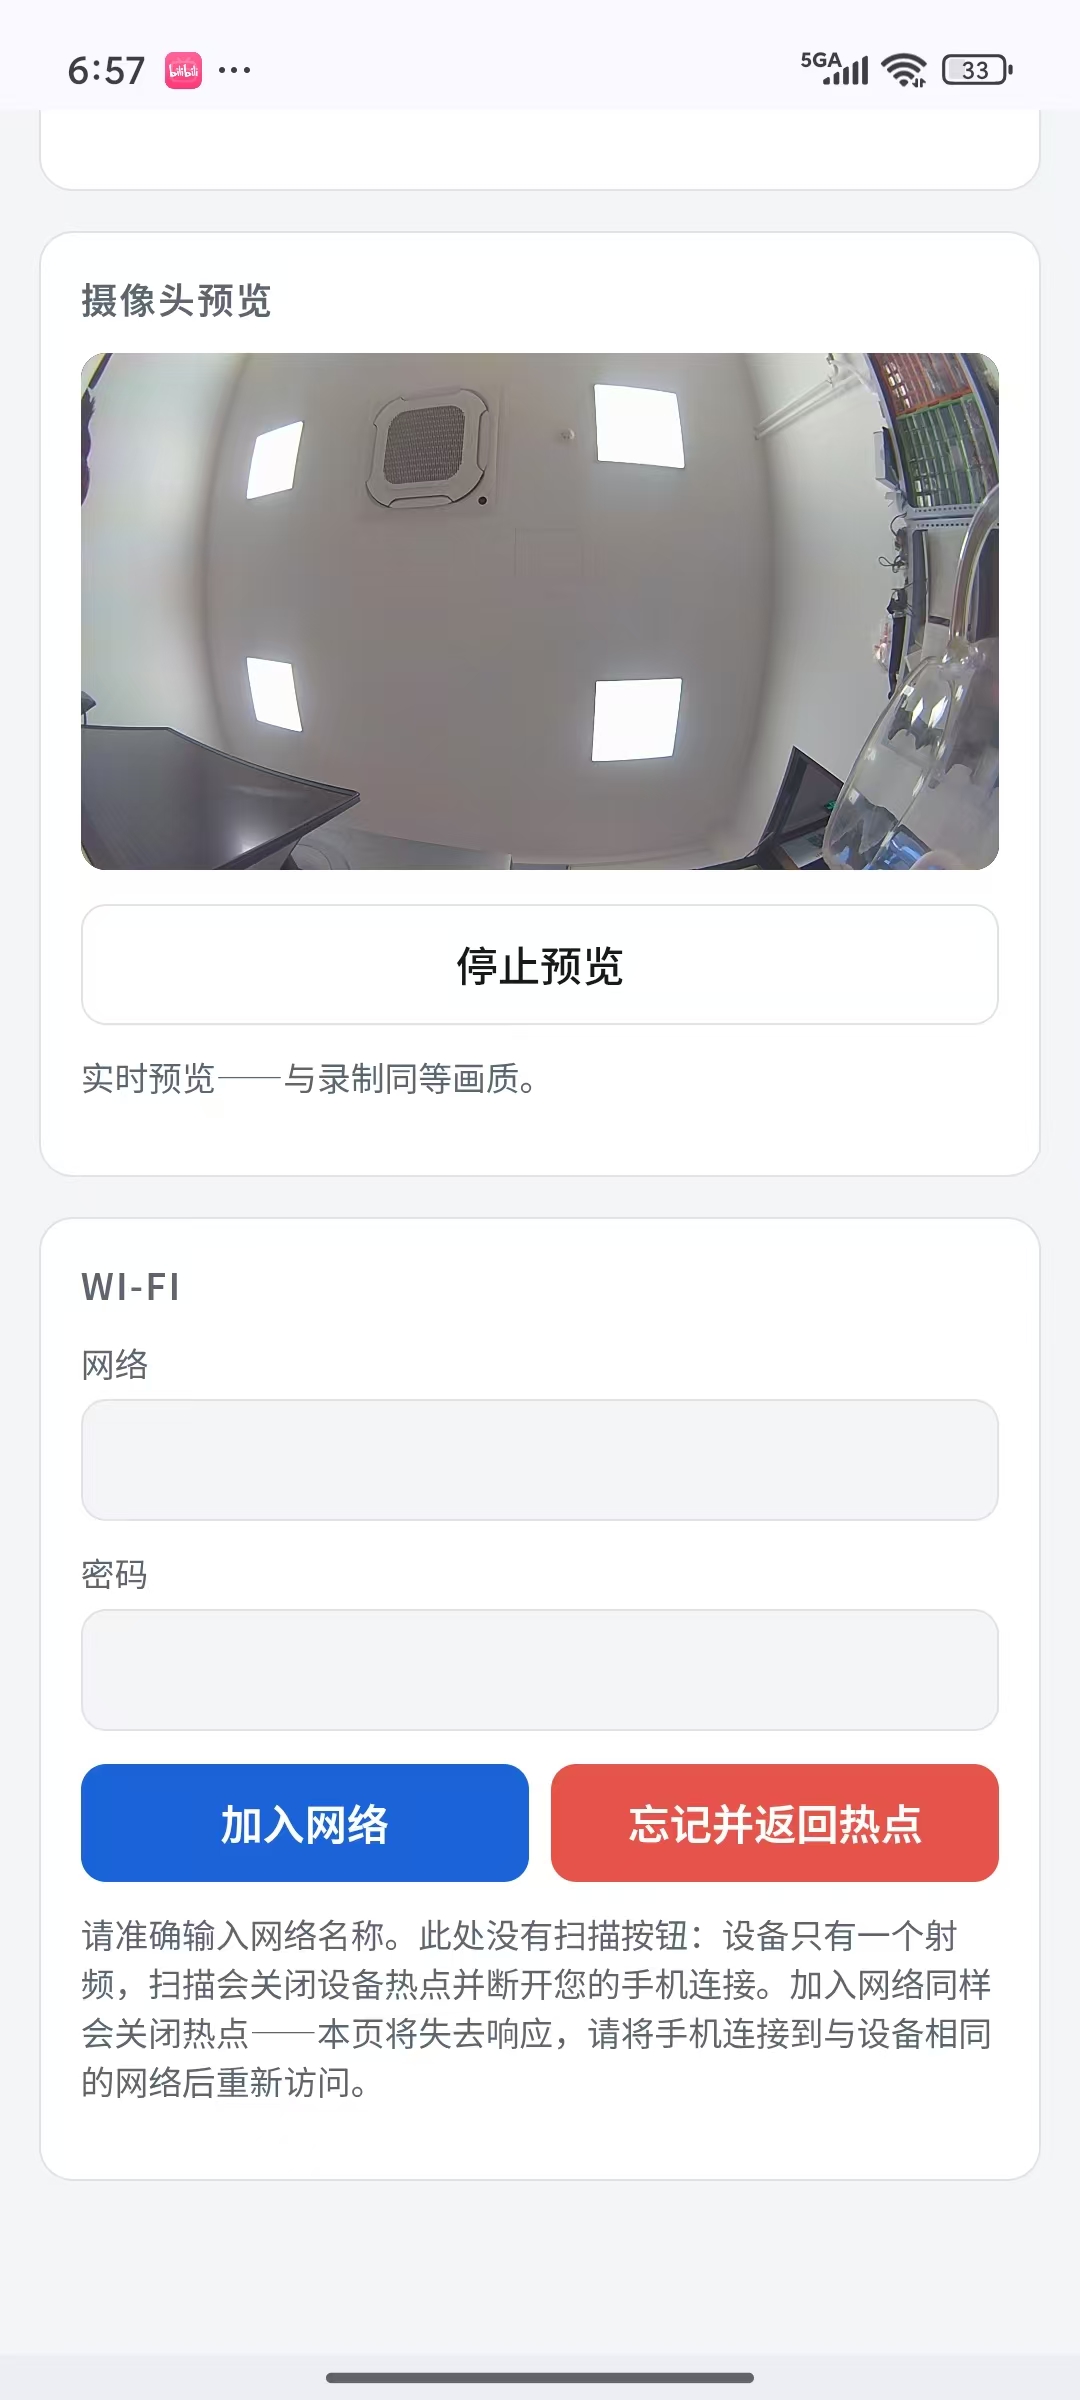
The web preview and the app show the same live stream.
If http://GILABS-XXXXXXXX.local does not open (some browsers and networks do not resolve .local names), use
hotspot mode with the fixed address 192.168.4.1 instead.
Android app
Install
- Package: Visio Companion (
.apk). Download the latest build from gilabs.xyz/products/mobile-apps; each release is also described in App release notes. - Open the downloaded file on the phone to install. If the system warns about an "unknown source", allow it as prompted.
Connect over the hotspot
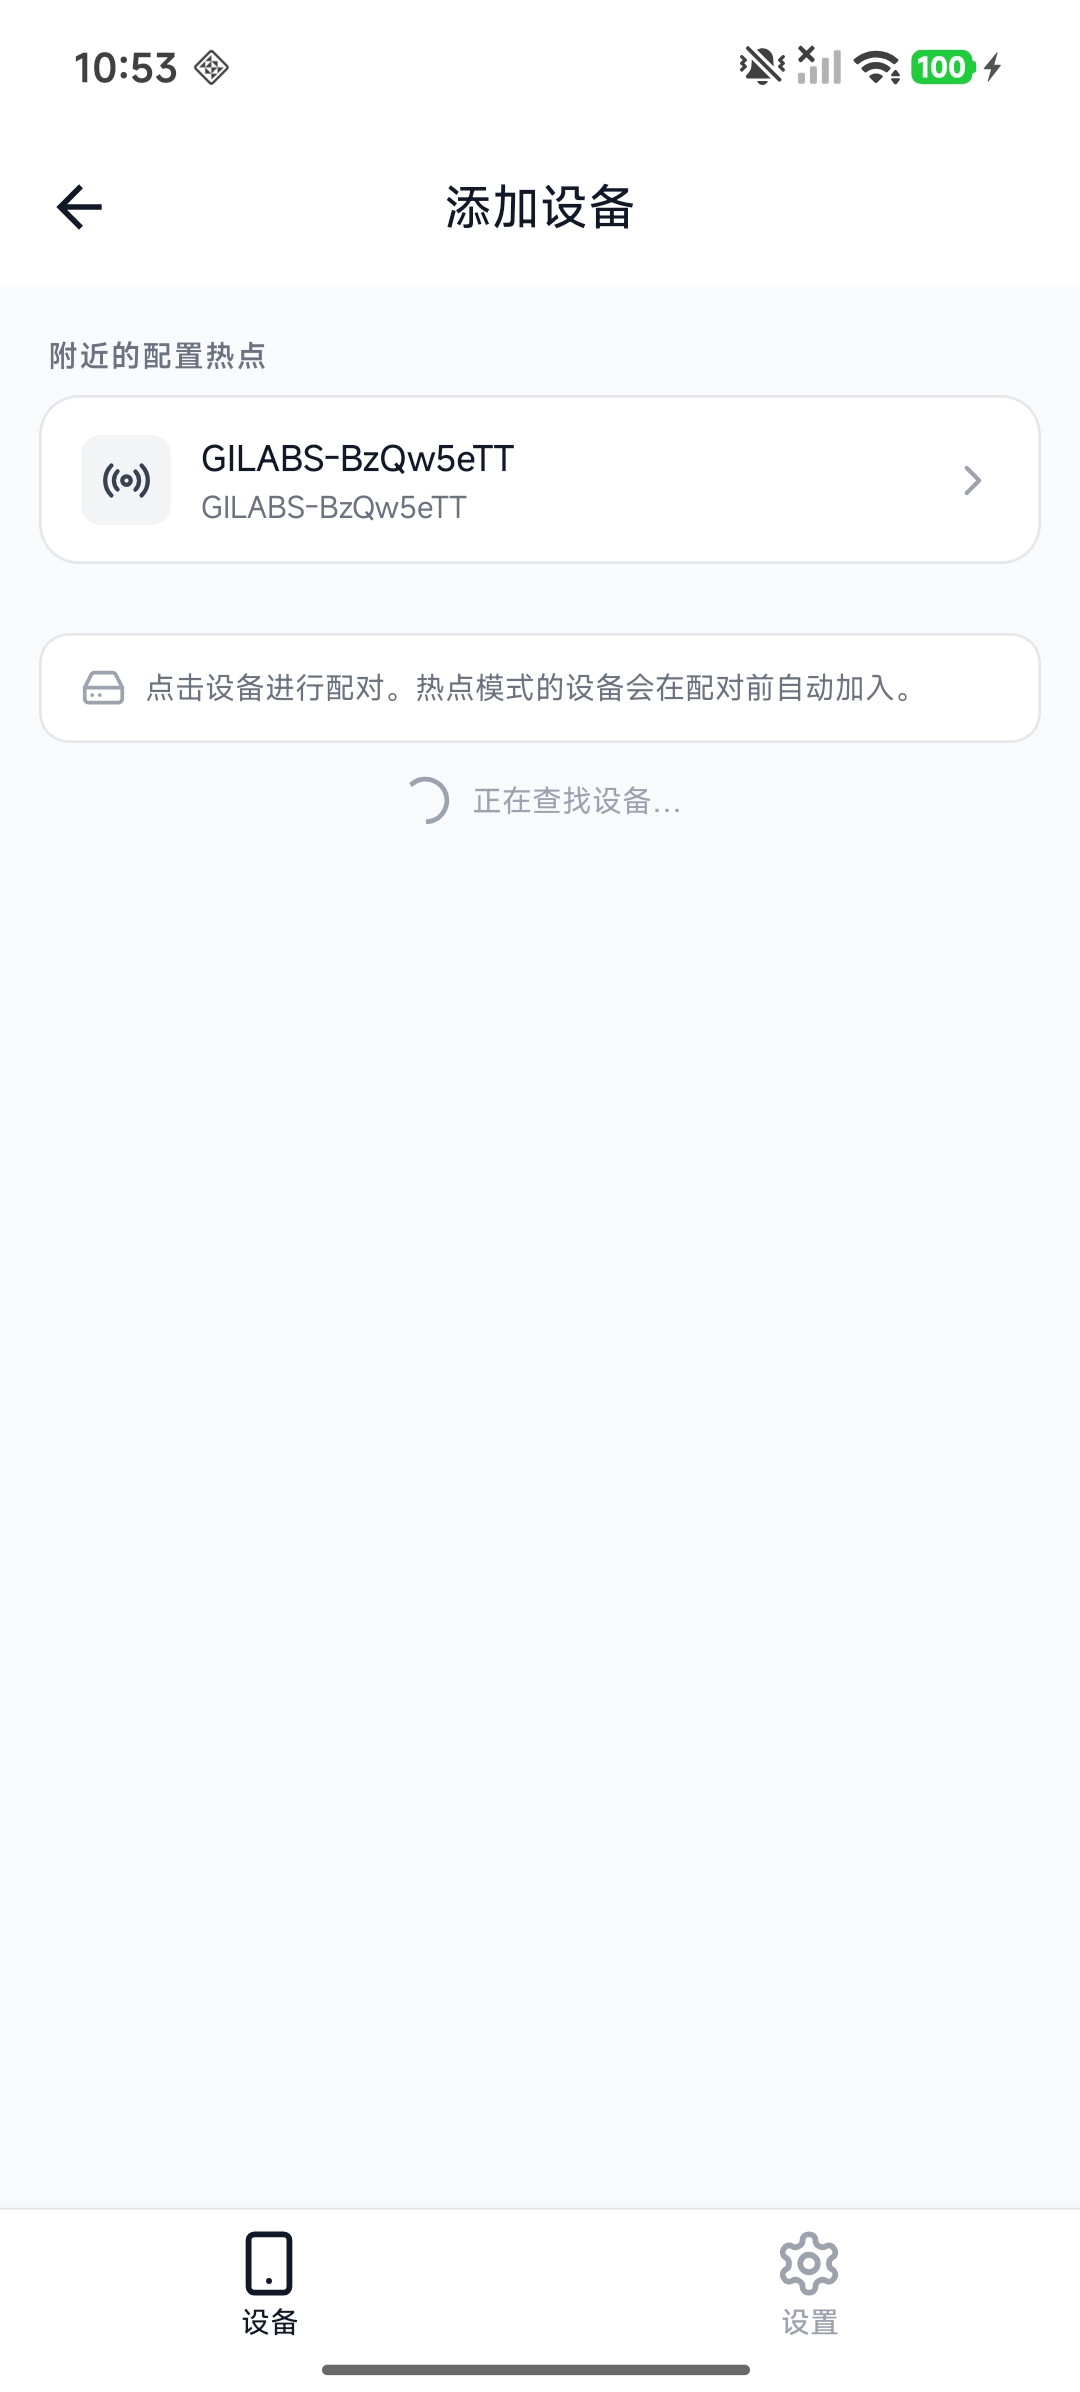
- Power the device; its hotspot is named GILABS-XXXXXXXX (the code is on the back label).
- Open Devices → + → Nearby setup hotspots, select your device, and allow the connection prompt. If both devices share Wi-Fi, choose it under On this Wi-Fi network. An EGO1GS with Bluetooth control connection enabled (firmware 1.1.6+) also appears in the Bluetooth group. Bluetooth supports recording control and settings; preview, recording copies, and firmware upgrades still need Wi-Fi or USB.
- If automatic hotspot joining fails, join it manually in the phone's Wi-Fi settings, keep the connection despite the no-internet warning, then return to the app.
USB: connect the phone and device with a USB-C data cable, then select the device under Add device → USB. Android requests camera permission for USB device access; the app does not use the phone camera for this. Opening Add device also requests Bluetooth permission for discovery. USB is more stable and upgrades faster.
Configure Wi-Fi
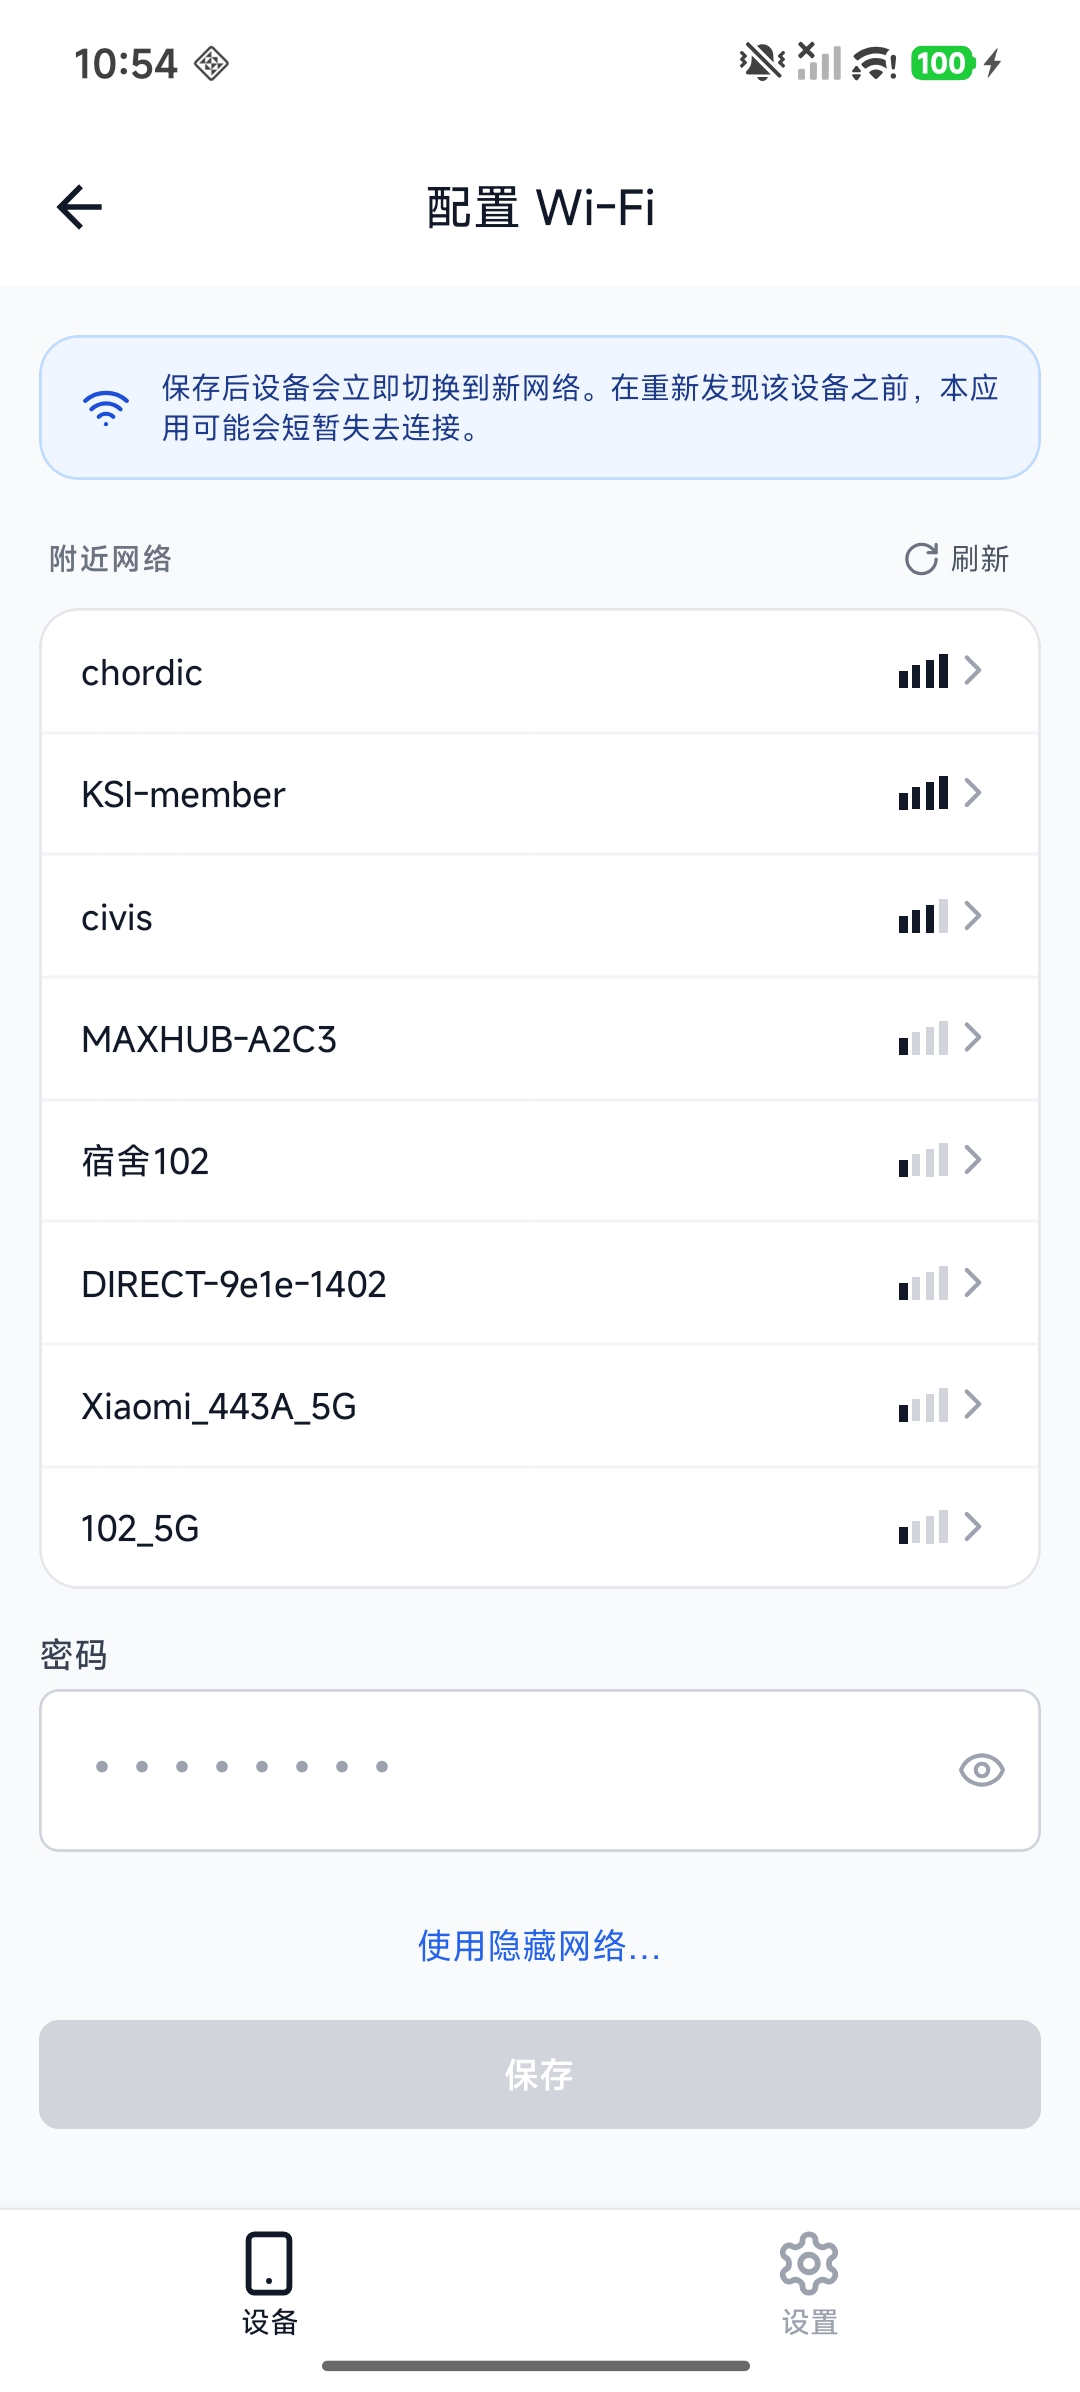
Tap the gear on the device page → Device settings → Configure device Wi-Fi. Choose a nearby network (on iPhone, type its case-sensitive name), enter the password, and save. The app follows the device onto Wi-Fi; if it does not reconnect, return to Devices and add it again.
Firmware upgrade (OTA)
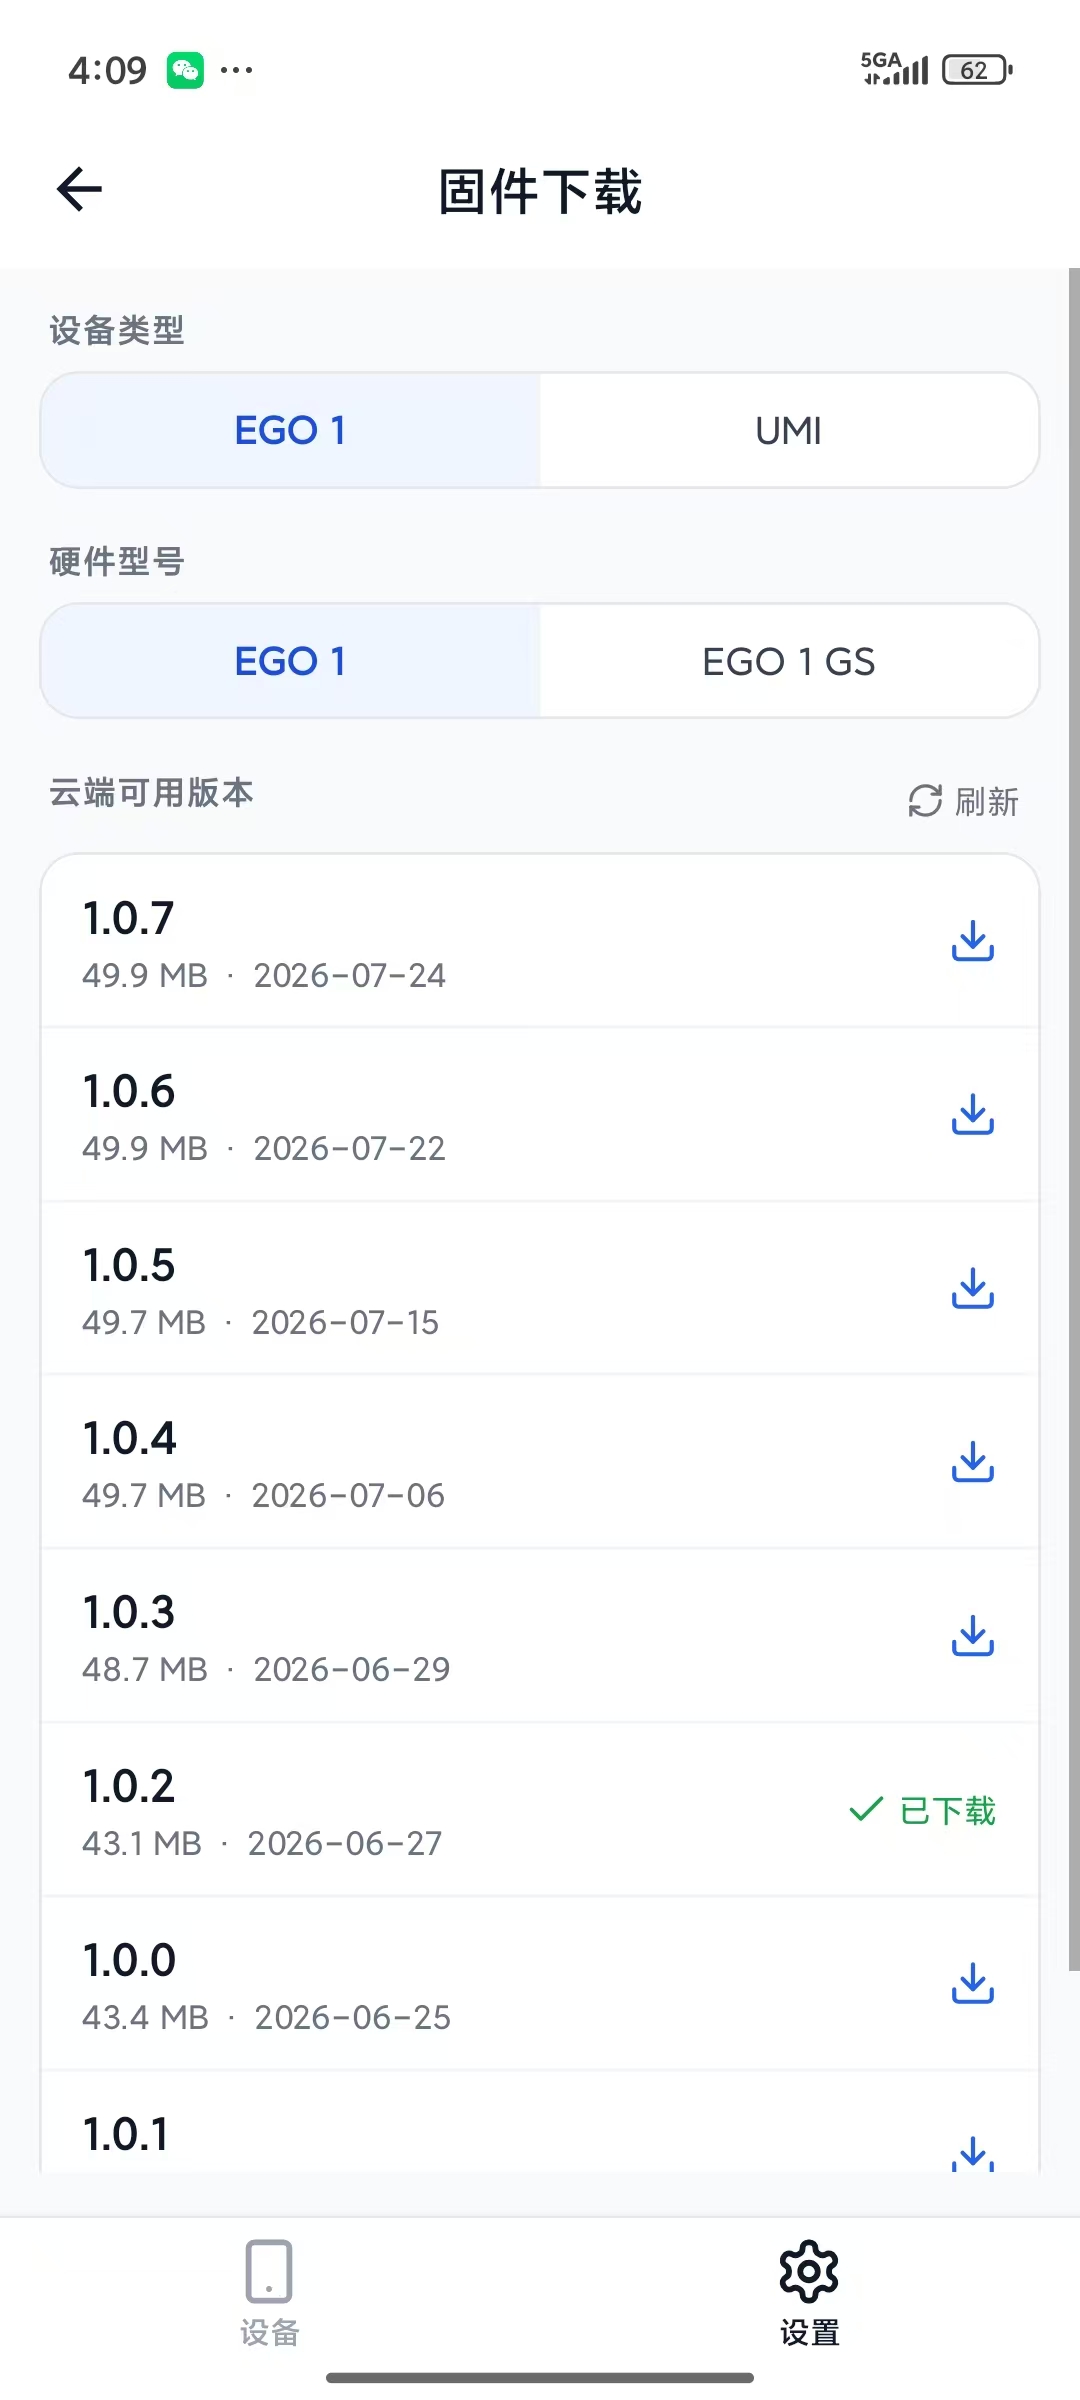
- With internet access on the phone, go to Settings → Firmware downloads. Under Device type pick EGO 1; under Hardware pick EGO 1 or EGO 1 GS to match your device, then download the image for the version you want.
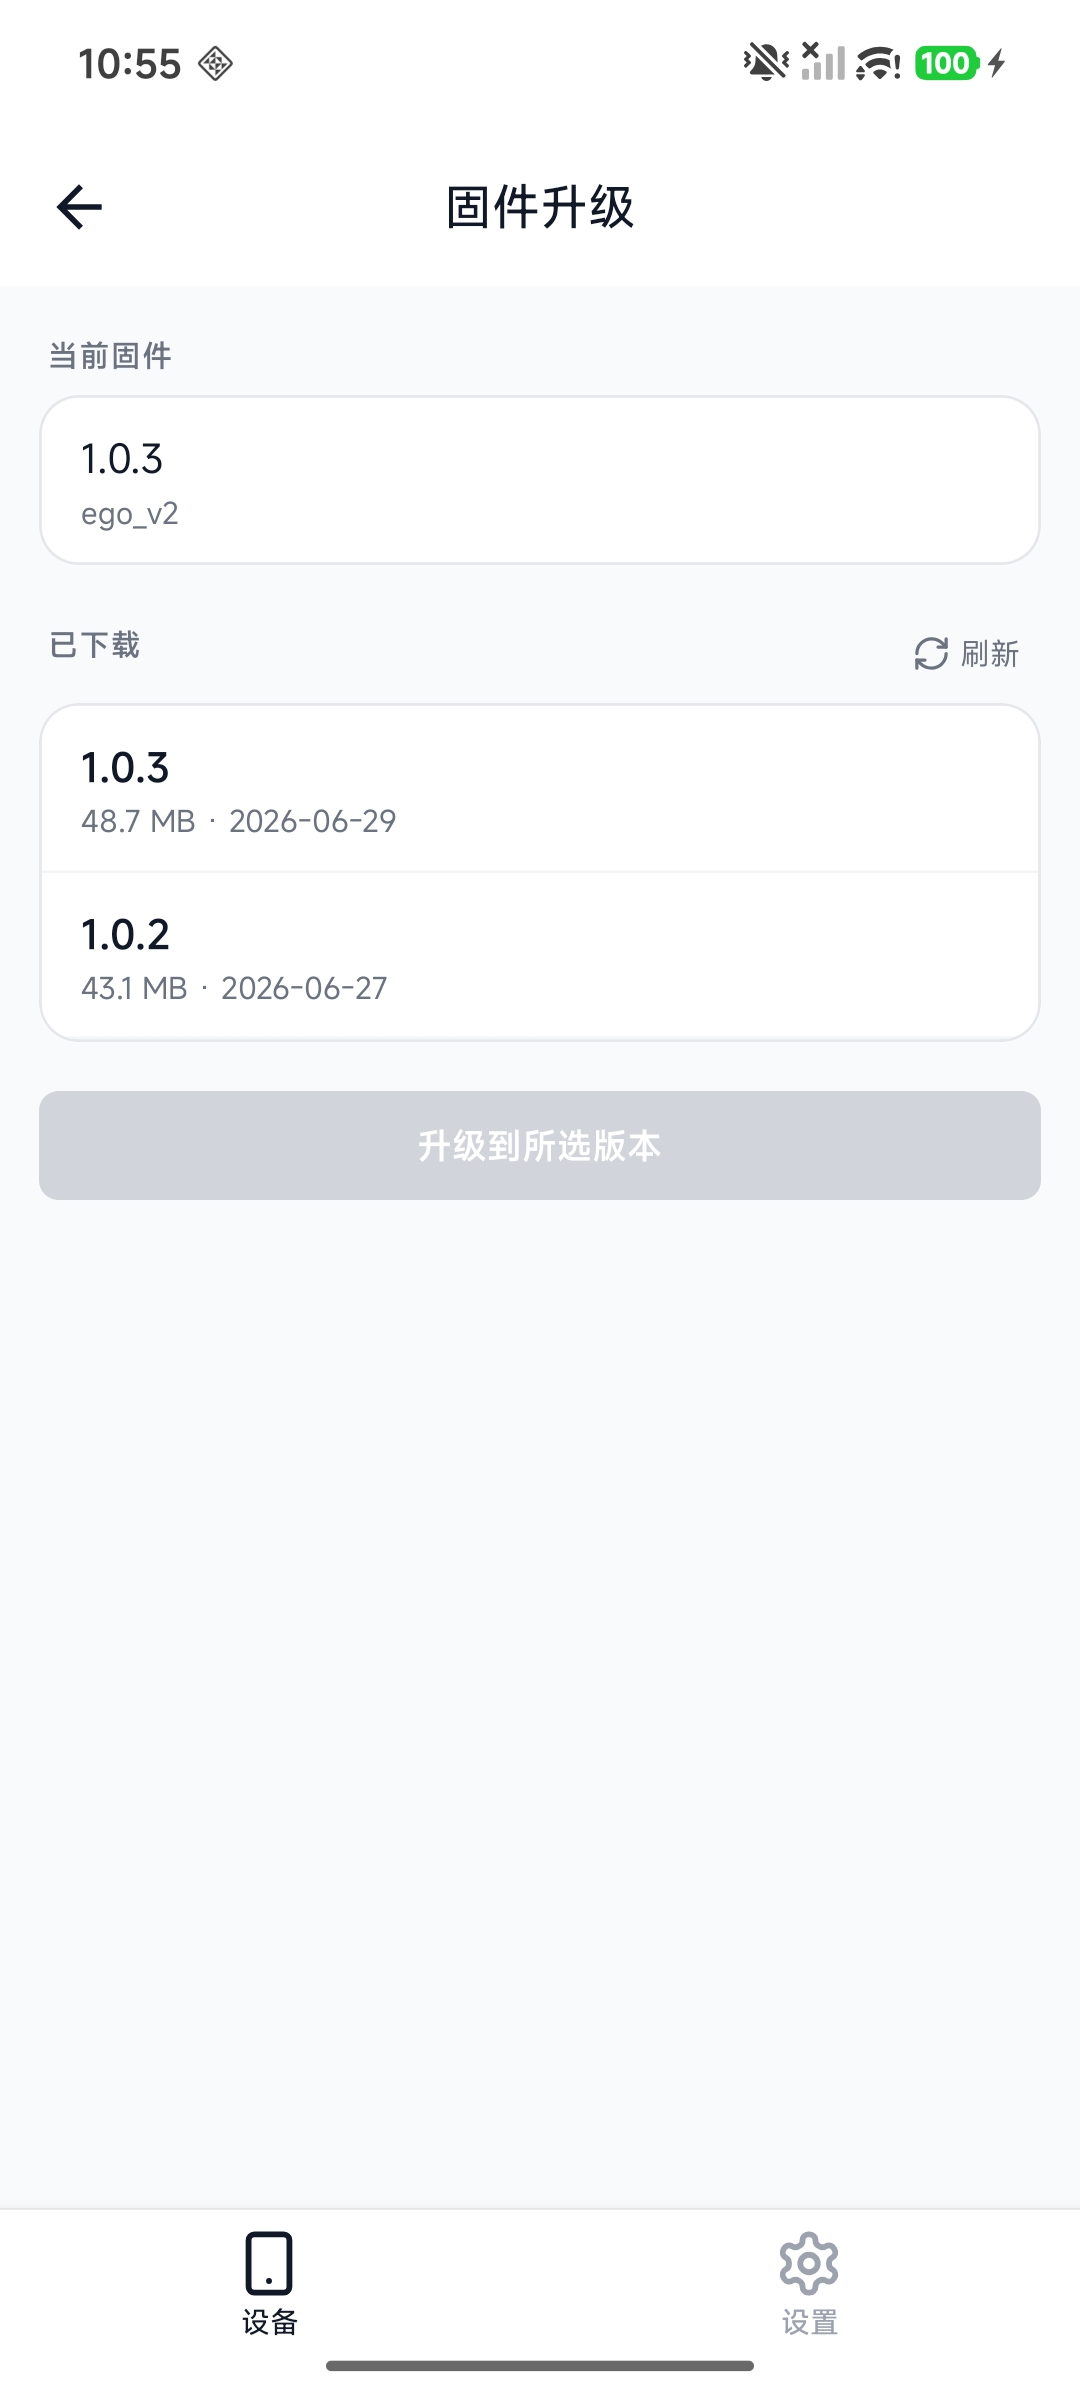
- Go to Device info → Firmware upgrade, choose the downloaded image, and tap Upgrade to selected.
- The upgrade takes about 5 to 10 minutes. Keep the phone close to the device throughout. If you were connected over the hotspot, the app reconnects automatically after installation and the device reboot (about 20–30 seconds).
- Upgrading over a USB connection is faster. Keep the app in the foreground; it keeps the screen awake. Stop recording before starting an upgrade.
EGO1 and EGO1GS are different boards with different sensors, and each takes its own firmware. Installing the wrong
image will not give you a working device. If you're unsure which you have, check Device info → Hardware
version: ego_v2 is EGO1, audio_ego_v3 is EGO1GS. See Which one do I have?.
Not sure which version to install? Firmware release notes lists the current version per variant and the versions that are deprecated. USB upgrade needs firmware 1.0.4 or later on the device; on older firmware, upgrade over the hotspot first.
When the device comes back online, Current firmware at the top of the upgrade screen shows the new version.
Live preview and capture metadata
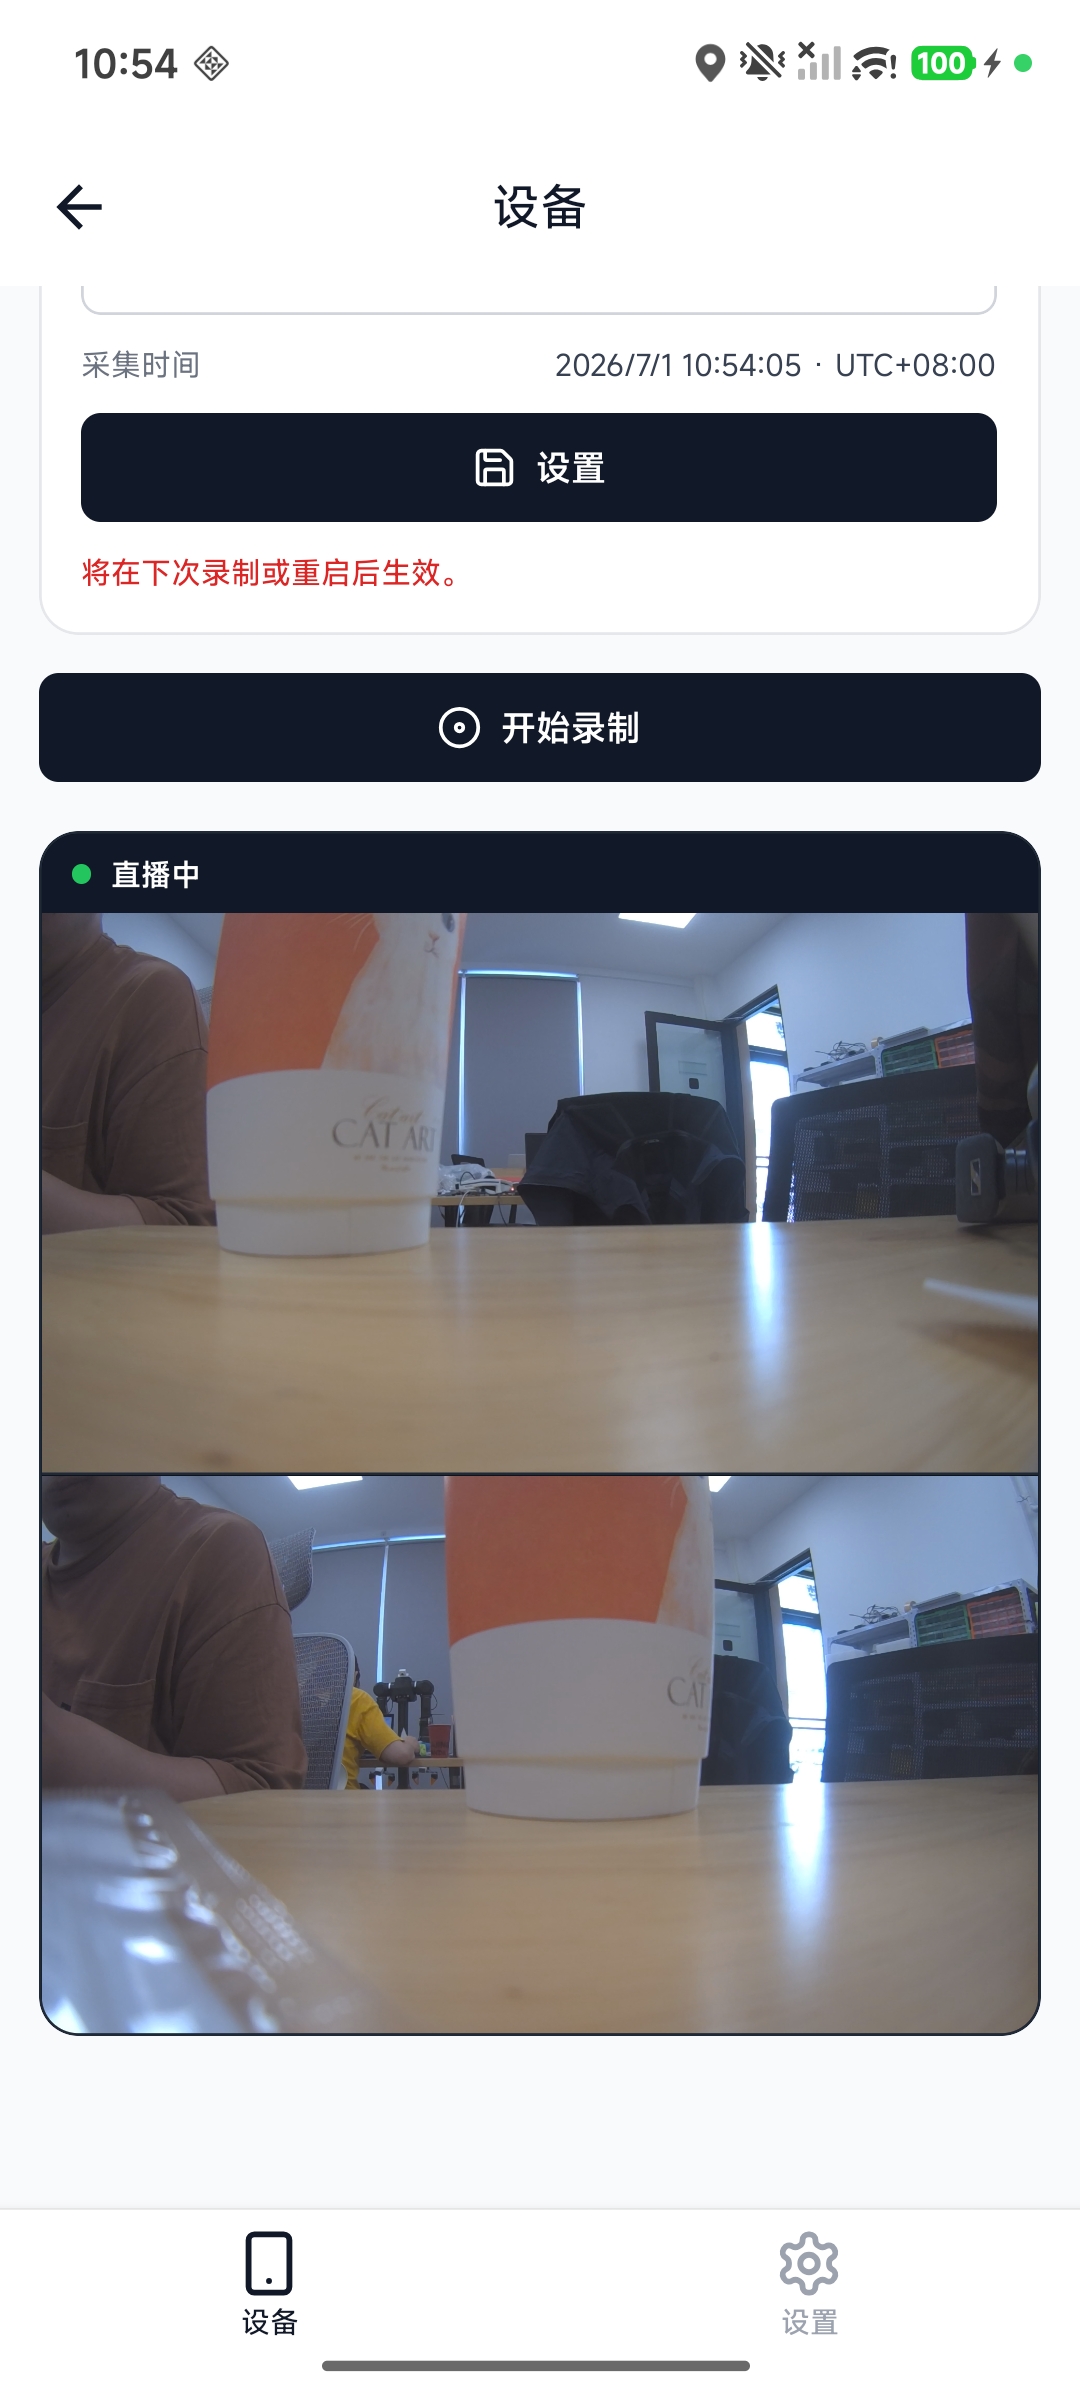
- Live preview: one camera by default; tap Show stereo for both (uses more bandwidth). EGO1GS can overlay hand boxes. With firmware 1.1.6+, EGO1GS pauses preview at high temperature and explains why; recording continues and preview returns after cooling.
- Capture metadata: enter Task, Location, Note, and Capturer, then tap Set to save defaults for subsequent recordings, including recordings started with the physical switch. GPS is attached only when Tag recordings with location is enabled in app Settings.
- Start / stop recording: use the buttons or physical switch. While recording, the app shows the task and start time. Over USB, Record to can select Device SD card or Phone (USB); phone recording needs no SD card.
Preview confirms framing; the saved recording is the data to review. Occasional preview flicker or stutter is usually phone decoding lag and does not affect the recording.
Device info and management
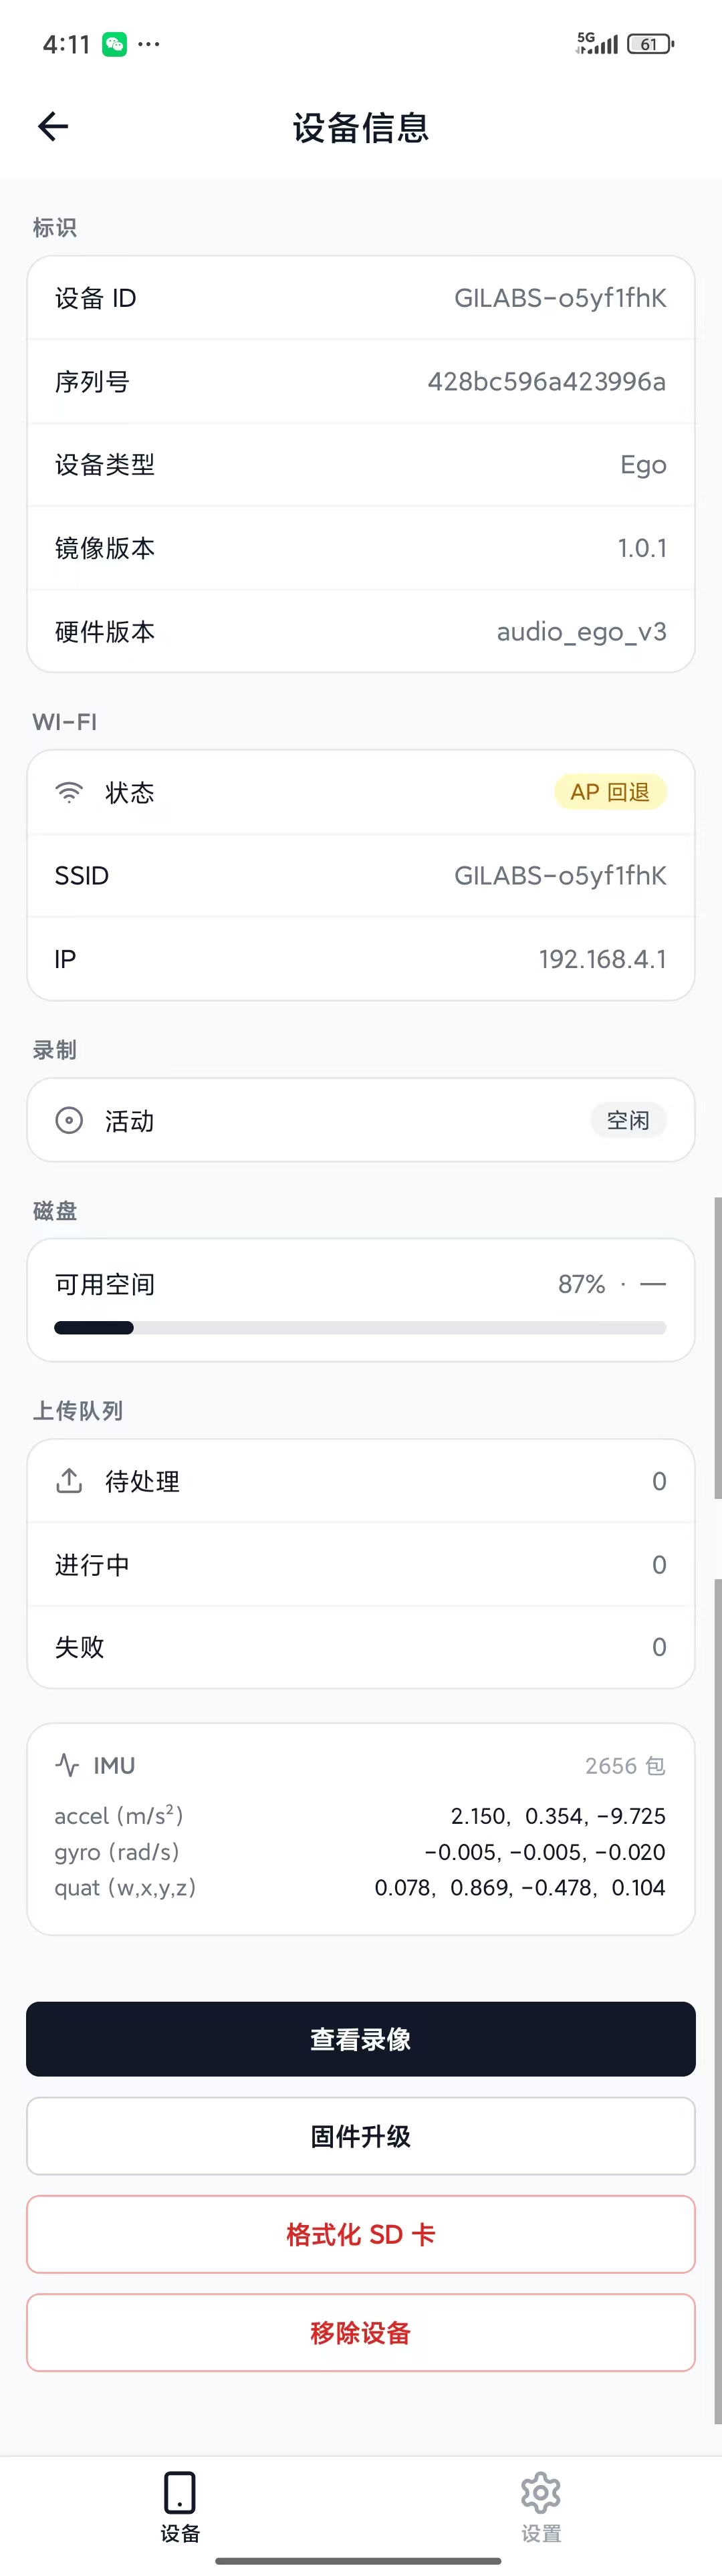
Device info shows identity, serial number, device type, firmware and hardware versions, Wi-Fi / SSID / IP, recording and encryption status, free SD space, upload queue, processor and camera temperatures, EGO1GS thermal protection status, and live IMU acceleration / angular velocity / temperature. It also offers View recordings, Firmware upgrade, Format SD card, and Remove device.
Under View recordings → Device SD card, copy recordings to the phone or delete them (firmware 1.1.6+). Copying needs Wi-Fi or USB networking and is unavailable during recording; preview pauses during copying. Copied files appear under This phone. See Copy recordings to a phone.
Device settings
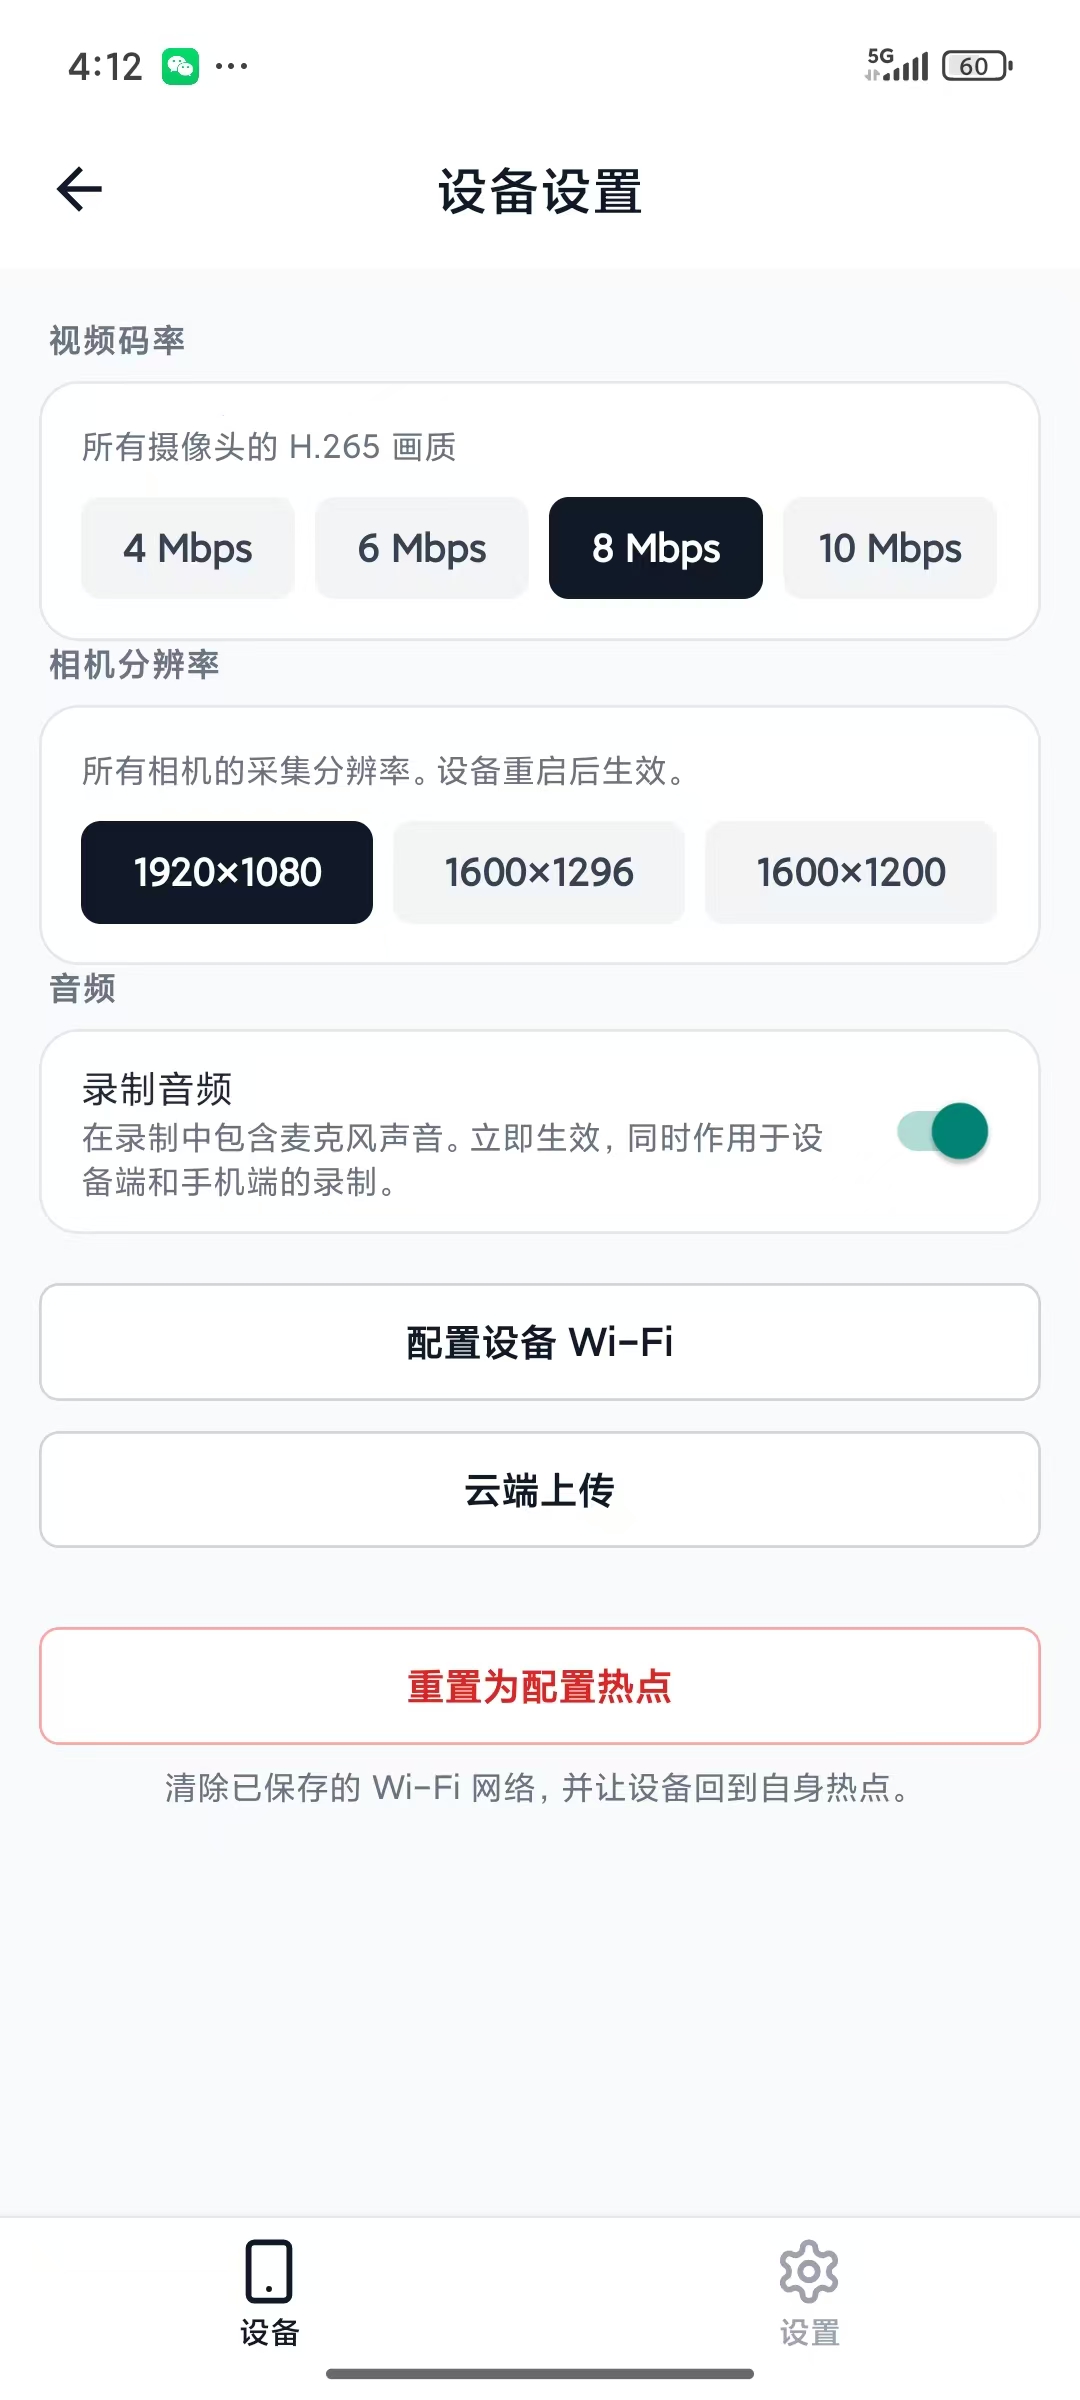
Under Device settings you can adjust:
-
Video bitrate: 4 / 6 / 8 / 10 Mbps, the H.265 quality for all cameras. Takes effect after a reboot.
-
Camera resolution: EGO1 offers 1920×1080, 1600×1296 and 1600×1200; EGO1GS offers 1920×1080 and 1728×1200. Takes effect after a reboot.
-
Audio (EGO1GS): whether the microphones are recorded. Takes effect immediately.
-
Voice volume (EGO1GS): 0 to 100 for the spoken notices; 0 is silent. Since app 1.1.0.
-
Recording reminder (EGO1GS): a short tick every few seconds while recording, so the wearer can't forget. Off by default. Since app 1.0.9.
-
Hand detection (EGO1GS): on-device hand detection, off by default. See Hand detection. Since app 1.1.3.
-
Bluetooth control connection (EGO1GS, firmware 1.1.6+): off by default; recording control and settings only. When disabled it uses no power. Preview, copies, and upgrades require Wi-Fi or USB.
At the bottom of the page, Reset to setup hotspot clears the saved Wi-Fi networks and returns the device to its own hotspot.
Cloud upload
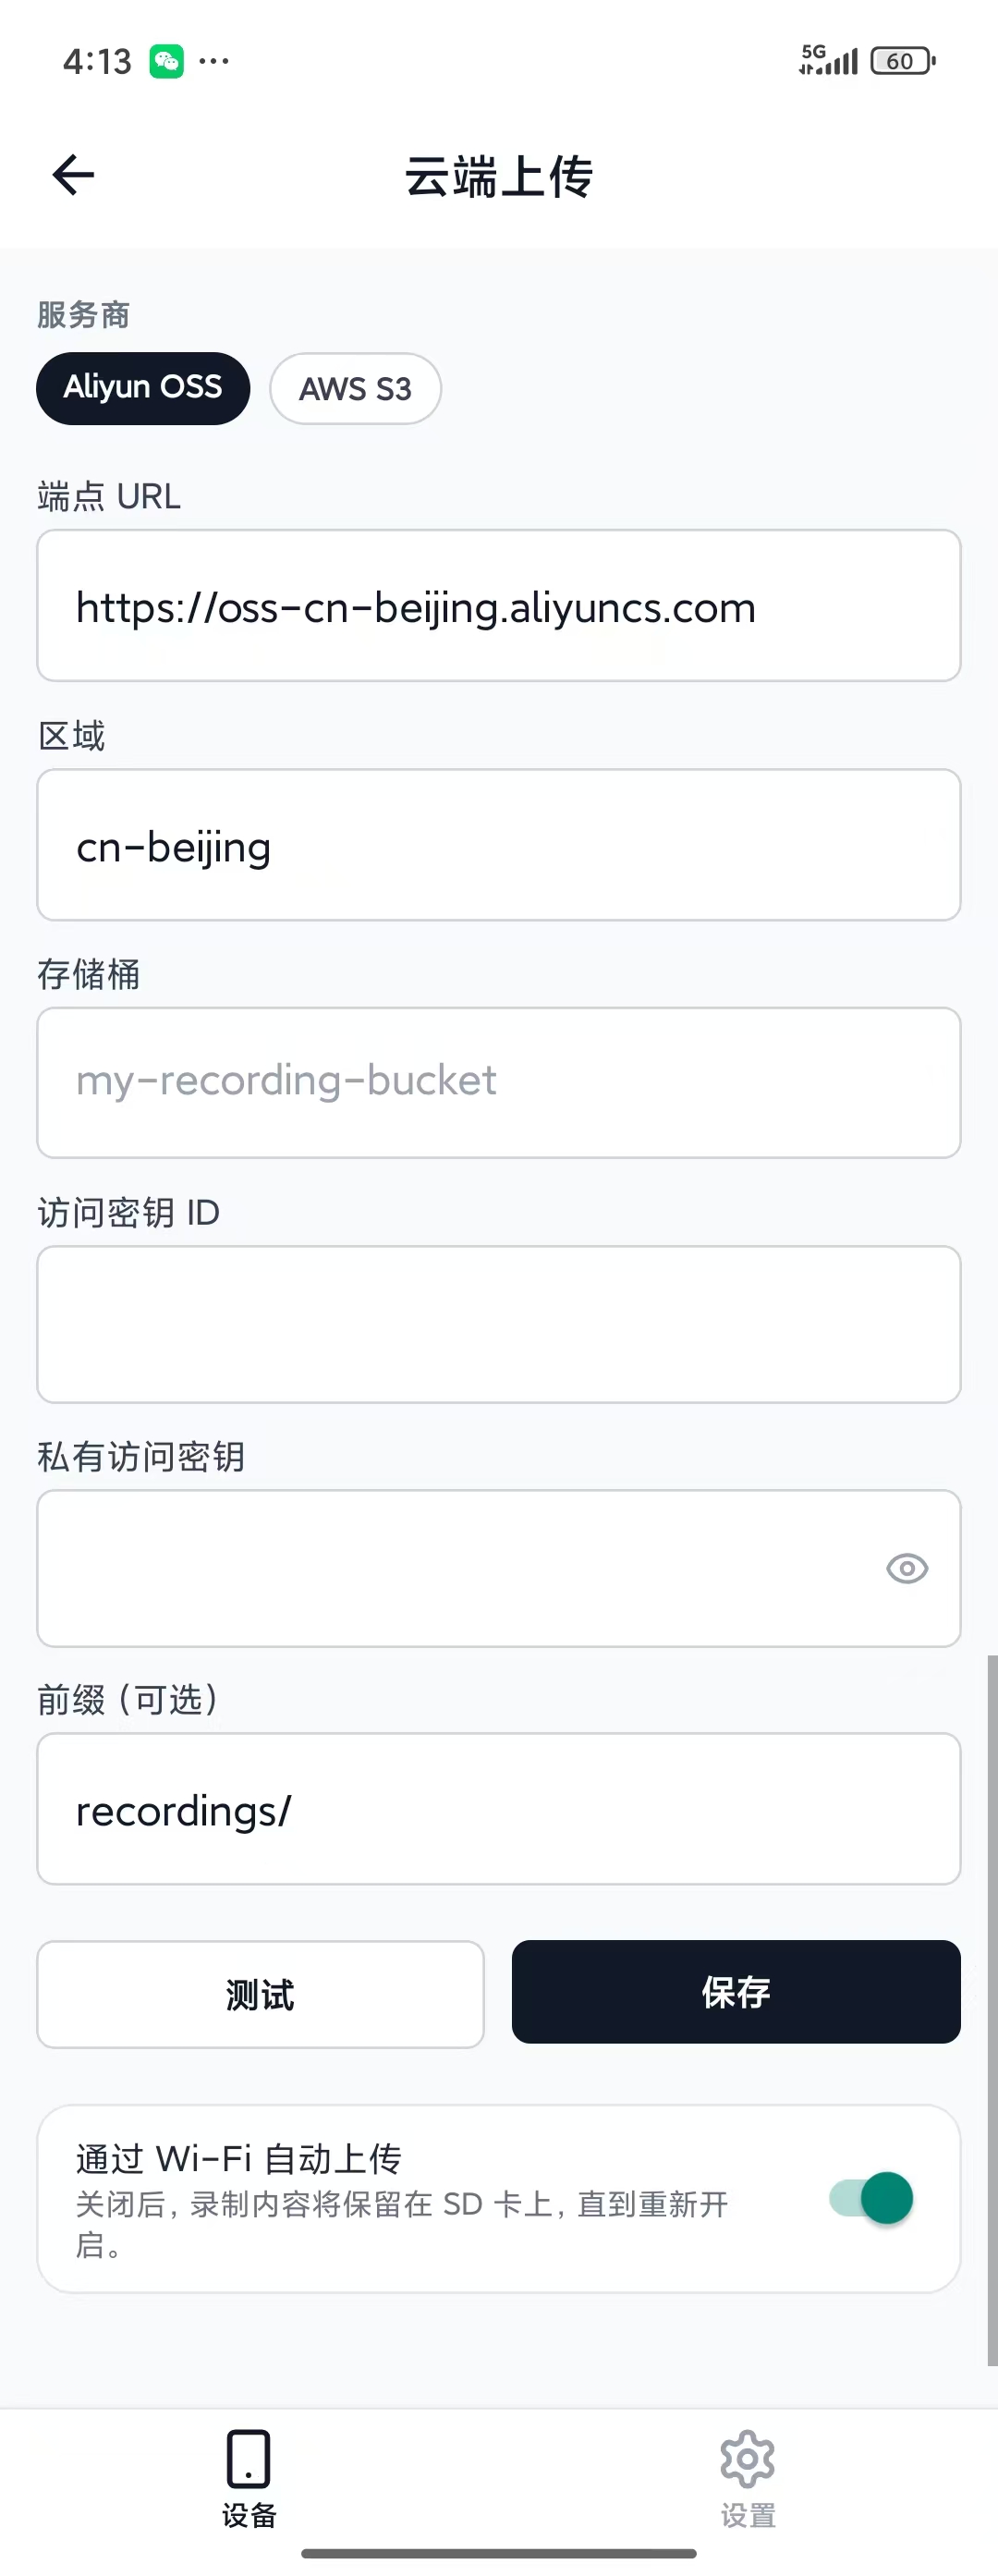
Under Cloud upload you configure object storage (Aliyun OSS, AWS S3, Tencent COS, Google Cloud Storage, or Azure Blob): endpoint URL, region, bucket, access key, plus the prefix and on/off switch for each of the two channels, recording upload and status reports. Tap Test to verify, then Save. With Auto-upload over Wi-Fi on, finished recordings upload while the device is idle and on internet-connected Wi-Fi. Uploads pause during recording. Successfully uploaded recordings are deleted from the SD card; with upload off they stay on it.
The full setup, including creating the bucket and keys on Aliyun OSS and monitoring a whole fleet through status reports, is in Cloud upload & fleet status.
Problem reports and repairs
- Report a problem: the button at the top right of the device page sends diagnostic logs and an optional note, with no video, audio, or location. Offline reports are queued on the phone and sent once it has internet. Manage them under Settings → Support & after-sales → Pending problem reports.
- Request a repair: under Settings → Support & after-sales → Request repair, scan the device barcode, describe the problem, and supply the required photos or self-test. A self-test includes a few seconds of video and audio. Track the request and enter shipment details in My repair requests after approval.
See 14. Support & repairs for the complete process and what is uploaded.
iOS app
Install Visio Companion from the App Store: China mainland · US and other regions. Allow Local network (device connection), Location (hotspot identification and optional recording location), Camera (QR scanning), and Bluetooth (device discovery) when prompted.
iPhone cannot scan nearby Wi-Fi hotspots inside the app. First join GILABS-XXXXXXXX in system Wi-Fi settings, or put the phone and device on the same Wi-Fi, then open Devices → +. Bluetooth-enabled EGO1GS devices appear in the Bluetooth group for control only. To configure device Wi-Fi, enter the exact, case-sensitive SSID manually. Preview, metadata, upgrades, settings, cloud upload, and QR configuration otherwise follow the Android workflow.
HarmonyOS app
Install from Huawei AppGallery. Connection (including USB), preview, and firmware upgrades follow the Android workflow.
Under the hood
Ways to reach the device
| Route | When to use it |
|---|---|
| Its setup hotspot | First contact, or any time there's no shared network. Needs no infrastructure. |
| Your Wi-Fi network | Normal operation once the device has joined your network. Required for cloud upload. |
| USB | Bench work: the most reliable link, and it powers the device at the same time. |
Bluetooth is an additional control-only route on EGO1GS firmware 1.1.6+ when enabled.
The device runs its hotspot and your network at the same time, on two independent Wi-Fi legs, so
http://192.168.4.1 is always a way in, including while you are reconfiguring the network settings. A mistyped
passphrase never locks you out.
Unlike hotel Wi-Fi, the device does not trigger the phone's captive-portal sheet, on purpose: it answers the phone's "is there internet here?" check with a success, because a phone that decides the network is useless roams back to a real Wi-Fi within about half a minute, which used to kill firmware updates mid-flight. The trade is that no sign-in sheet appears; type the address into the browser yourself.
Pairing in the app: Add Device scans USB, this Wi-Fi, and nearby setup hotspots at once and lists what it finds; tap a device to pair. On Android the app asks for the Camera permission before it can talk to a device over USB. The device presents a camera-class USB interface, and Android gates that interface behind the camera permission; the app does not use the phone's camera.
Networks the device cannot join
The device authenticates with a network name and a passphrase, and nothing else. Two common setups therefore fail, both looking like a working connection at first:
- Captive portals: guest Wi-Fi with a splash page that wants a click-through, a room number, or a browser login. The device associates and gets an IP, so the app shows it connected, but every upload is intercepted.
- Enterprise (802.1X / WPA2-EAP) networks that ask for a username and password. There is nowhere to enter them.
Use a WPA2/WPA3 network with a pre-shared key, a dedicated IoT SSID, or a phone hotspot.
Saved networks
The device remembers networks and tries them newest-first whenever it has no link, so a unit that moves between sites re-joins on its own. Under Saved networks the current one is marked Connected and you can Forget any single entry (since app 1.0.7), or clear all of them with Reset to setup hotspot under Device settings. Joining usually takes under 30 seconds; with wrong credentials the device says so and stays reachable on its hotspot. The setup page has no network scanner, on purpose (scanning costs the shared radio airtime on the link you are provisioning over), so type the SSID exactly, capitals included. Android can scan using the phone's radio; iPhone requires manual SSID entry.
Preview is not the recording
The device has one video encoder per camera, so preview is not a cheap second encode: it is the same H.265 stream at the same bitrate as the recording. The setup page keeps preview off until you ask, because a viewer costs real bandwidth on a shared radio, and it shows camera 0 only. In the app, preview defaults to one camera and can be switched to both (since app 1.0.7). A choppy preview means the viewer or the link is struggling, not the device: preview lag alone does not imply dropped frames in the recording.
Capture metadata
| Field | What goes in it |
|---|---|
| Task | What you are capturing |
| Location | Where you are capturing |
| Capturer | Who is operating the capture |
| Message | A note attached to the recordings |
Set them in the app or on the setup page; they persist as defaults for later sessions, land in each session's
session.json sidecar on the card, and are written inside the MCAP itself. The app attaches the phone's GPS coordinates only when location tagging is enabled. Metadata takes effect on the next recording; setting it mid-session does not retag the session
already running.
Bitrate, storage and uplink
The bitrate applies to each of the two cameras, so the number you pick is roughly doubled on the way to the card. At 1080p30:
| Preset | Both cameras | Sustained write | Per hour | 128 GB card holds |
|---|---|---|---|---|
| 4 Mbps | 8 Mbps | 1 MB/s | 3.6 GB | ~33 h |
| 6 Mbps | 12 Mbps | 1.5 MB/s | 5.4 GB | ~22 h |
| 8 Mbps (default) | 16 Mbps | 2 MB/s | 7.2 GB | ~16 h |
| 10 Mbps | 20 Mbps | 2.5 MB/s | 9 GB | ~13 h |
On EGO1GS, audio and the higher-rate IMU add roughly 0.4 GB per hour on top, regardless of bitrate. The device
itself accepts anything from 0.5 to 50 Mbps; to set a value outside the four presets, use a
settings QR code, which carries an explicit bitrate_kbps. If the app shows a
Current value that isn't a preset, the device was configured that way; that is expected, not a fault.
A genuine V30 card clears every preset, so on a real card the speed class never limits your bitrate; a counterfeit or worn card fails by not recording at all. And the bitrate you choose is also the rate you have to ship: with auto-upload on, the site's upload bandwidth has to beat about 16 Mbps sustained at the default, or the queue grows for as long as you keep recording. See Cloud upload & fleet status.
Recording to the phone over USB
The app can also record to the phone rather than to the card. Under Record to, switch from Device SD
card to Phone (USB): with the device connected over USB, the app writes the live streams to an .mcap on the
phone. No card is needed, and the device's record switch still starts and stops the capture. Since app 1.0.8 the
device no longer writes a second copy to the card in this mode. Use it for bench work and short verification
captures; for field sessions, record to the card, which does not depend on a cable staying seated or a phone
staying awake.
One phone at a time
Only one phone (or one web page) can control a device at once. If the app shows Device in use, another phone is connected: disconnect it, then pull down to refresh. Since app 1.0.8 the same phone can reclaim its own connection immediately after a reconnect instead of waiting for the old session to time out.